Saddle Fitting
How to Take A Wither Tracing Like a Saddle Fitter
What are wither tracings used for?
If you’ve worked with a saddle fitter before, you’ve likely seen them take tracings of your horse’s back and withers. Saddle fitters use wither tracings to keep a visual record of your horse’s changes in shape over time. A qualified saddle fitter will keep a file for your horse and use these tracings as a reference for ongoing fitting or flocking adjustments.
If you’re shopping for a saddle, wither tracings also help us evaluate the shapes and angles of your horse’s back so we can make better-informed recommendations. There’s no replacement for a hands-on fitting session, but for clients outside our travel range, wither tracings along with profile photos of your horse help us narrow down saddles and brands that may fit.
If you’ve purchased a new saddle with an interchangeable gullet system, such as a Bates or Wintec and would like us to custom fit the plate for your horse, the first thing we’ll ask for is a tracing of your horse’s withers!
What you’ll need for the tracing
- Flexible curve, at least 18″ long
- Marker, pen, or pencil
- 6″ or 12″ straight ruler
- 1/2″ masking tape (colored if possible–the standard beige will not easily show up on grays and other light coats!)
- Large (11″ x 17″ or equivalent) piece of paper
- Portable mounting block or step stool
- Digital camera (Digital makes it easy to delete bad pictures and then email, print, or copy to a CD to send with your saddle)
- A firm, flat, level surface like a tack trunk or table on which to make your tracings. DON’T do this on the ground; it’s not safe!
- A firm, flat, level surface where you can square up your horse, with plenty of room to safely walk around on all sides. Note: wash stalls don’t make good tracing areas as they’re typically slanted.
- An extra set of hands! Having someone to help you makes the whole process easier.
How to take a wither tracing
Begin by writing the date, your name, and your horse’s name on the tracing paper. Then, mark “LEFT” and “RIGHT” on each side of the paper to keep the templates accurate. You’ll be taking four tracings in total: the withers, mid back, last rib, and topline.
Stand your horse up as square as possible on flat, firm, level ground. Don’t worry if your horse won’t stand perfectly square, but do make sure he’s standing with weight on all four legs—no resting hind legs! The wash stall may look tempting but is not an ideal area for wither tracings, as they are typically slanted towards the drain.
Next, use the masking tape to mark BOTH left and right sides of your horse for the first three tracing areas.
WITHERS: Use two pieces of tape for each side. Use one piece to mark the back edge of the shoulder blade, and the second piece to mark 2 fingers’ worth or approximately 2″ behind the back edge of the shoulder blade. This is where the points of the saddle tree should rest.
MID BACK: Use one piece of tape to mark the deepest part of your horse’s back on each side.
LAST RIB: Follow the line of the last rib up your horse’s barrel. Mark the junction where the last rib meets the spine. This might be tricky to find on more “fluffy” barrels! Use your finger to feel for the edge of the ribcage.
You may discover that the marked areas are different from one side to the other. This is normal—the overwhelming majority of horses are asymmetrical. Please DO NOT adjust the tape to match each other as it’s very important to accurately see the true shape and asymmetry of your horse.
Mold the flexible curve over the areas marked with masking tape, beginning with the second piece 2″ behind the shoulder blade. It helps to have someone holding one side of the flexible curve steady while you mold the opposite side. This keeps the flexible curve in place and makes for more accurate tracings.
Carefully, lift the flexible curve from your horse’s back, keeping the left side of the curve in your left hand, and the right side in your right. For the first tracing of the withers, position the left end of the flexible curve on the side of the paper marked “LEFT.” The top of the curve should be centered, about 1/3 of the way down from the top edge of the paper.
Trace the inside edge of the curve onto the paper using the marker. Make sure not to bend or move the curve with the marker while making the tracing!
Repeat Steps 4 and 5, molding the flexible curve over the tape marking the mid back and last rib.
The mid back tracing should be centered about 1″ above the top of the curve of the wither tracing, and the last rib tracing should be set 1″ above the mid back tracing, near the top edge of the paper.
This layout makes the lines of each tracing clear and easy to read. Otherwise, the lines might get crossed, making it more difficult to evaluate the shape of your horse’s back.
The topline tracing measures the vertical drop and profile of your horse’s back. You don’t need to mark any areas for this tracing, but DON’T remove the tape yet! Before taking the last tracing, draw a horizontal line from the left to the right side of the paper, about 4″ from the bottom of the paper.
Flatten the flexible curve. Then, place one end at the first tape marking the back edge of the shoulder blade. Support the flattened curve horizontally over the spine at the tape marking the last rib. Raise or lower the end until it’s horizontal. You may want to use a single spirit level if one is available—this will ensure the flattened curve is truly level in relation to the horse’s back.
Then, using the 6″ or 12″ straight ruler, measure the distance from the underside of the flexible curve to the horse’s back at the last rib. Mark that distance beneath the horizontal line on your paper.
Next, take a tracing to show the shape of your horse’s topline from wither to last rib. Mold the flexible curve along the top of your horse’s spine from the first marking at the wither to the last rib.
Carefully transfer the flexible curve from your horse’s back to the paper. Place the wither end of the flexible curve beneath the left edge of the horizontal line you drew in the previous step. The other end of the flexible curve should line up with the mark you made for the vertical drop measurement. Trace the topline profile from the underside of the flexible curve.
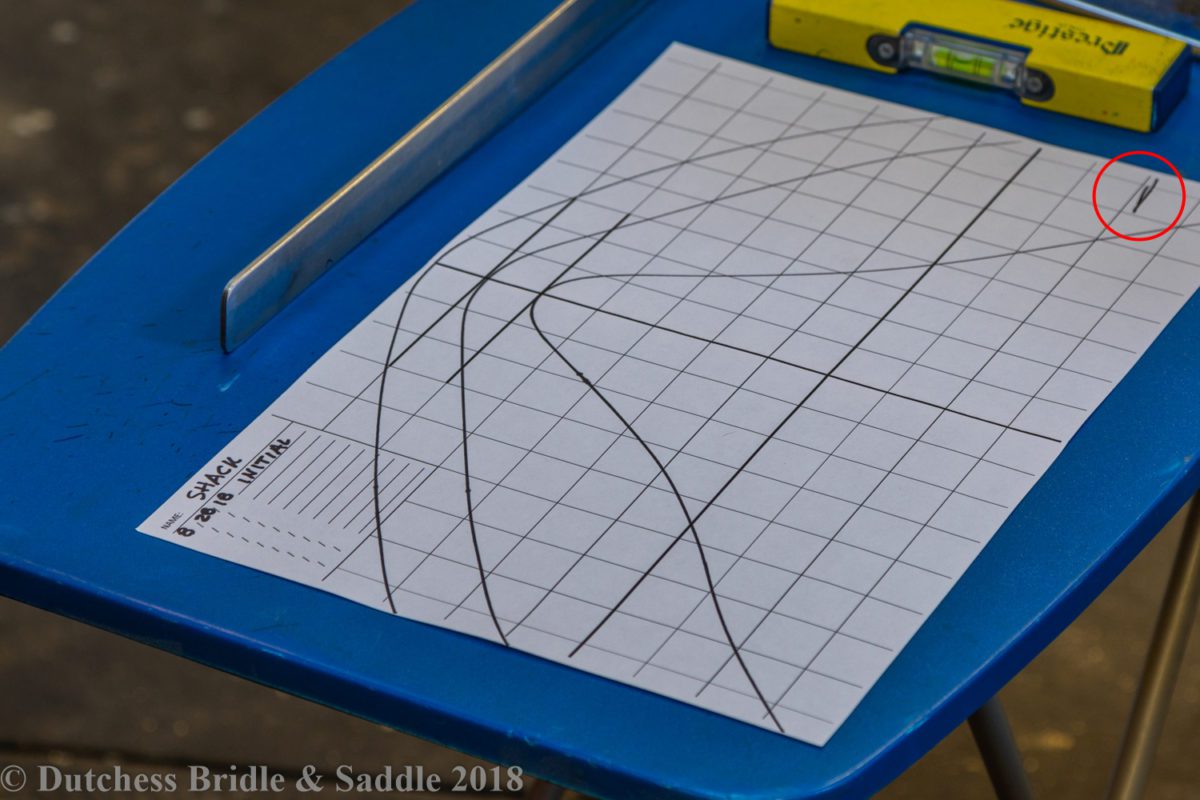
Check your final tracing layout to make sure you’ve got everything! You should have a note for name and date, wither profile tracing, mid-back tracing, last rib tracing, horizontal line, vertical drop measurement, and the topline tracing.
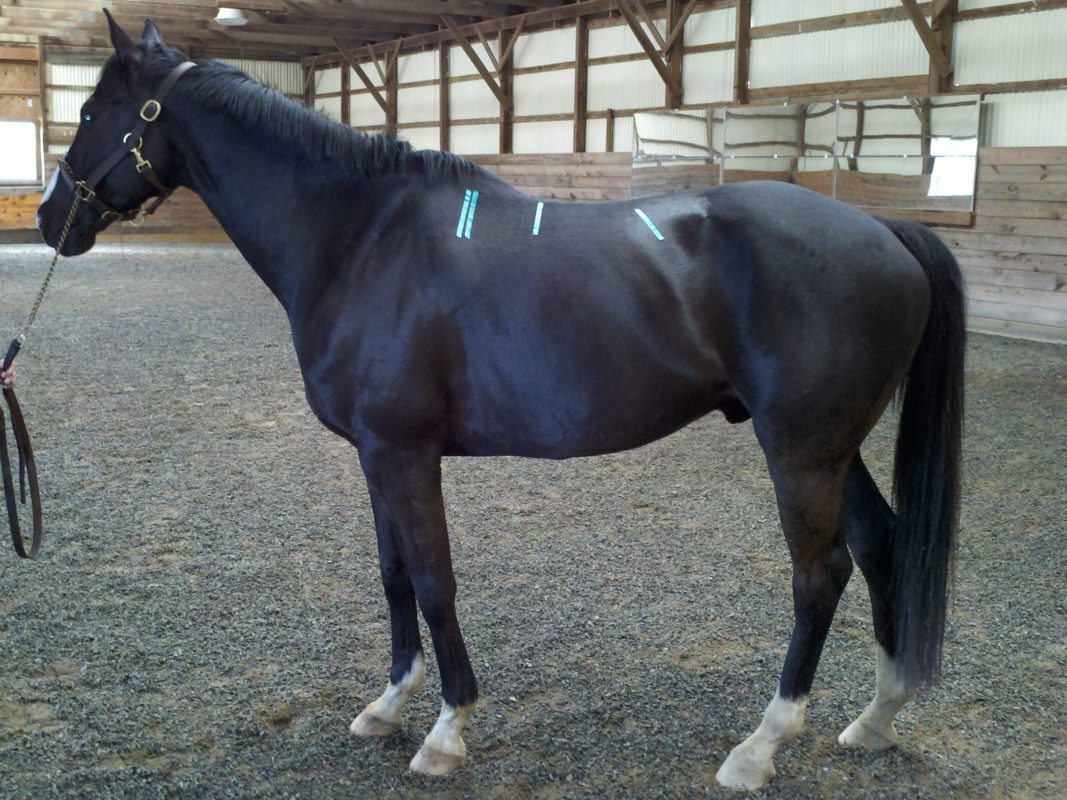
Use colored masking tape to mark tracing areas for the withers, mid back, and last rib.
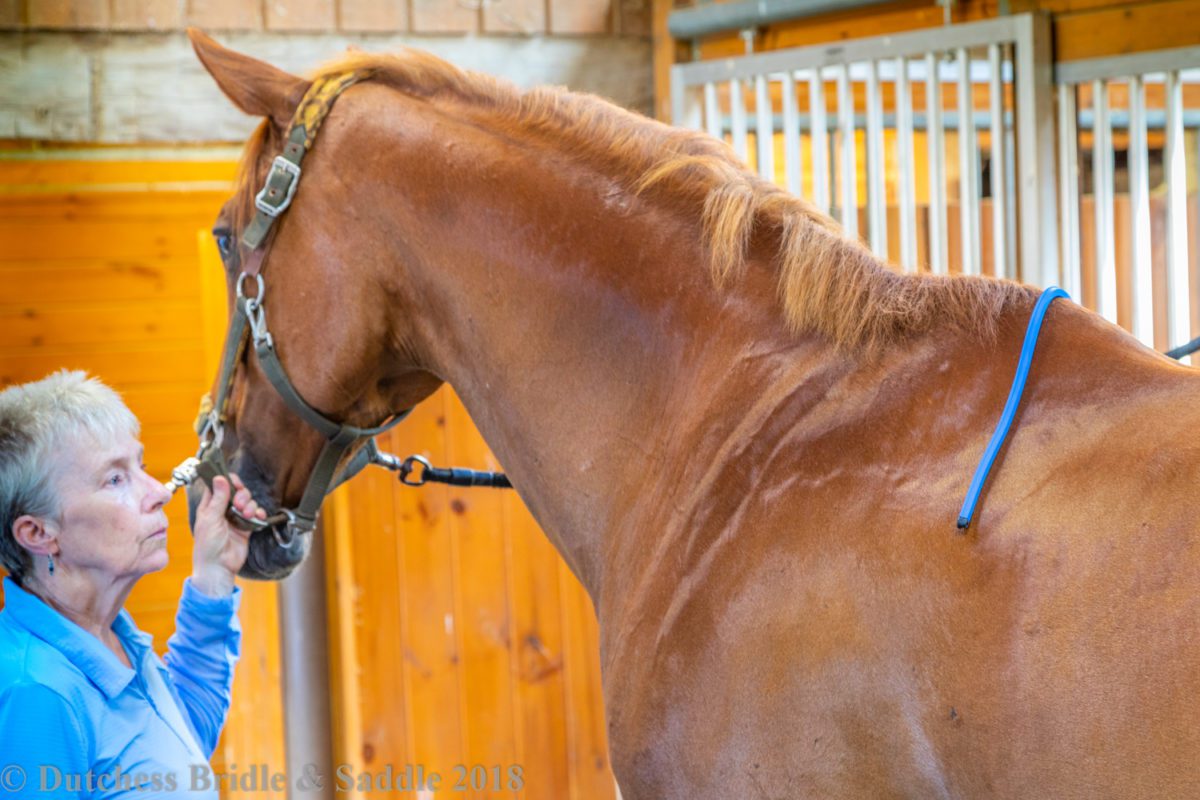
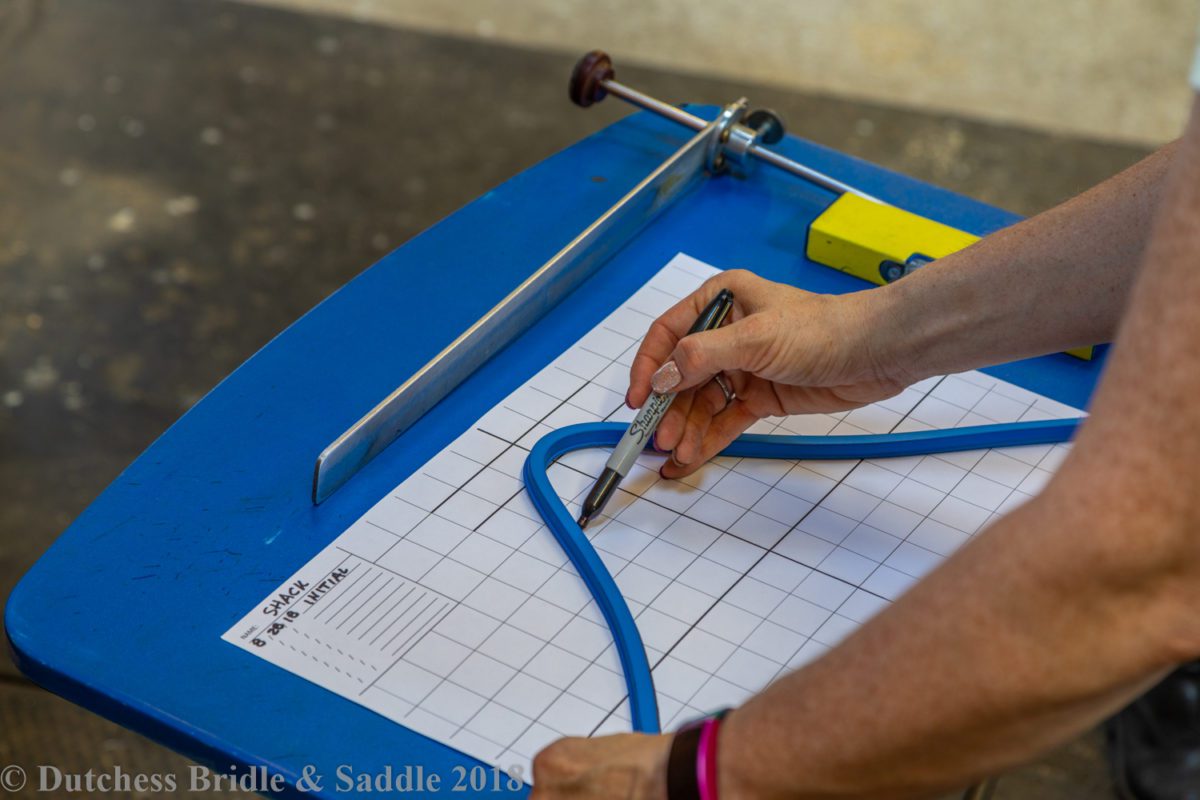
Trace the inside edge of the flexible curve onto the paper.
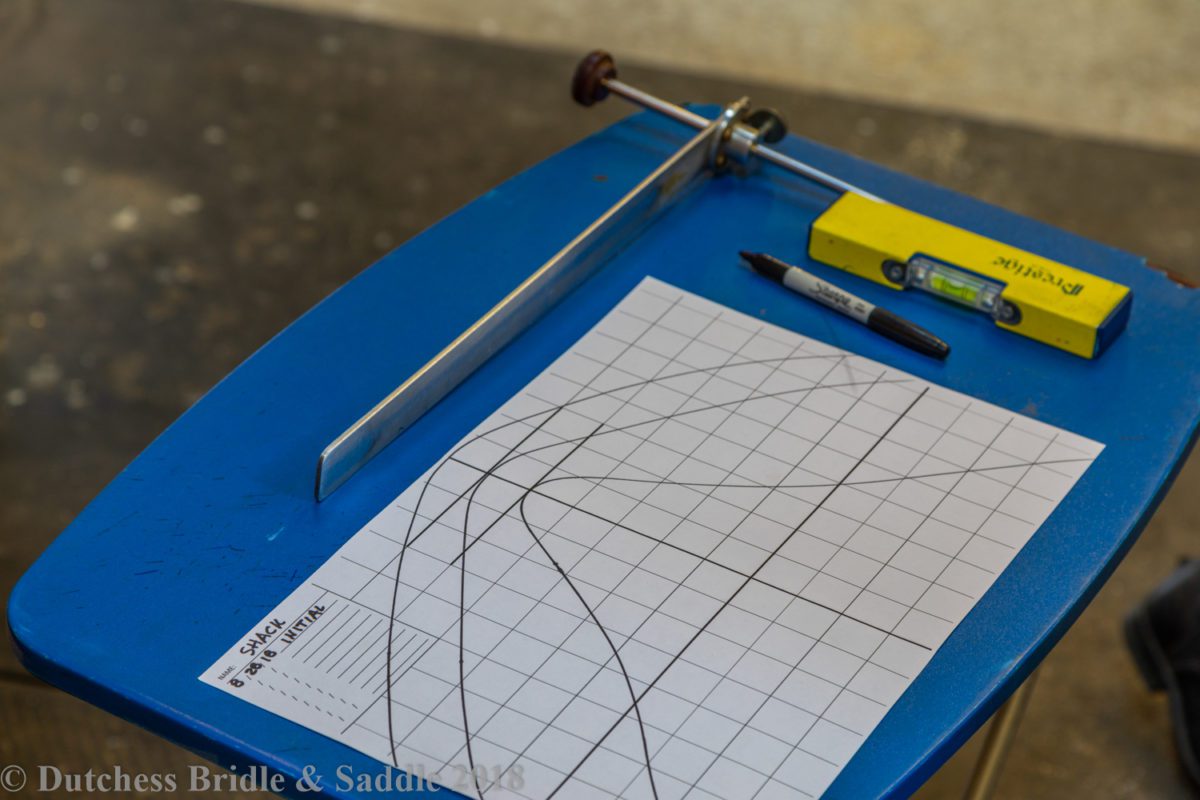
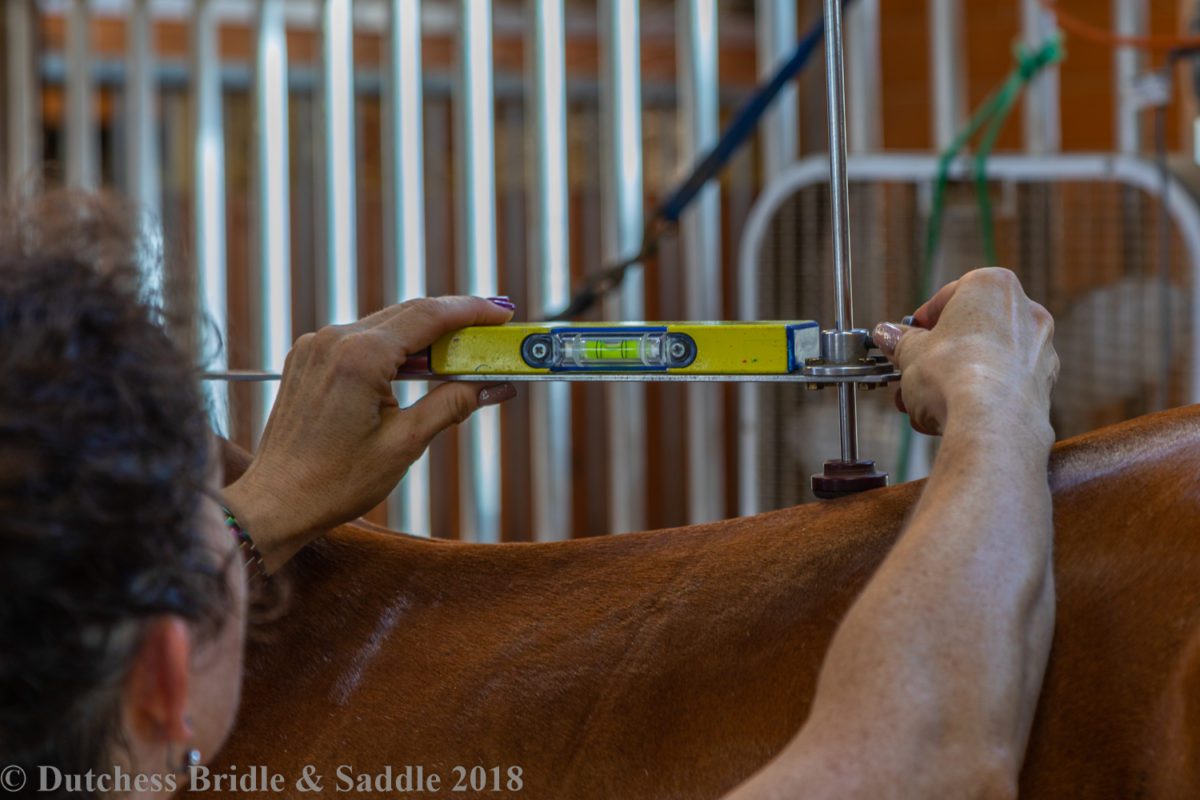
If you don’t have a spirit level handy, use the flattened flexible curve as a straight line from the top of the withers, and use your ruler to measure the vertical distance from the back.
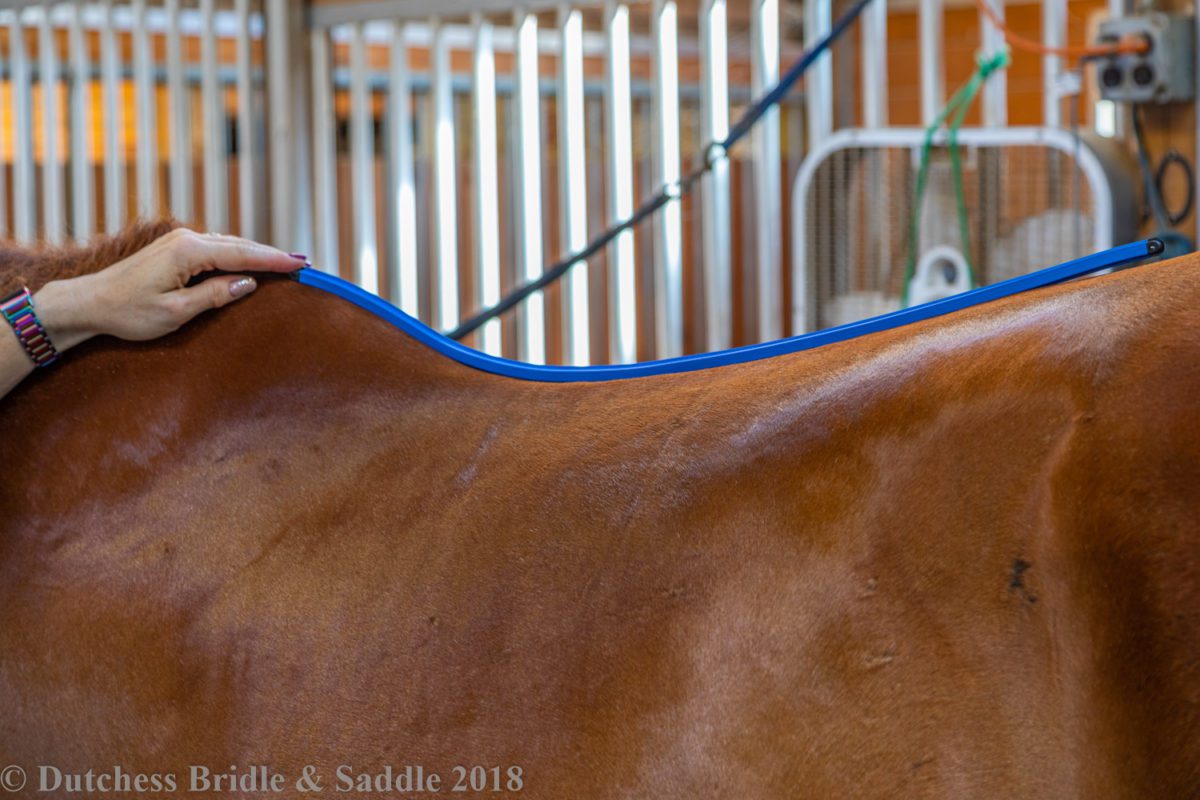
Mold the flexible curve over the spine from withers to last rib to show the shape of the topline.
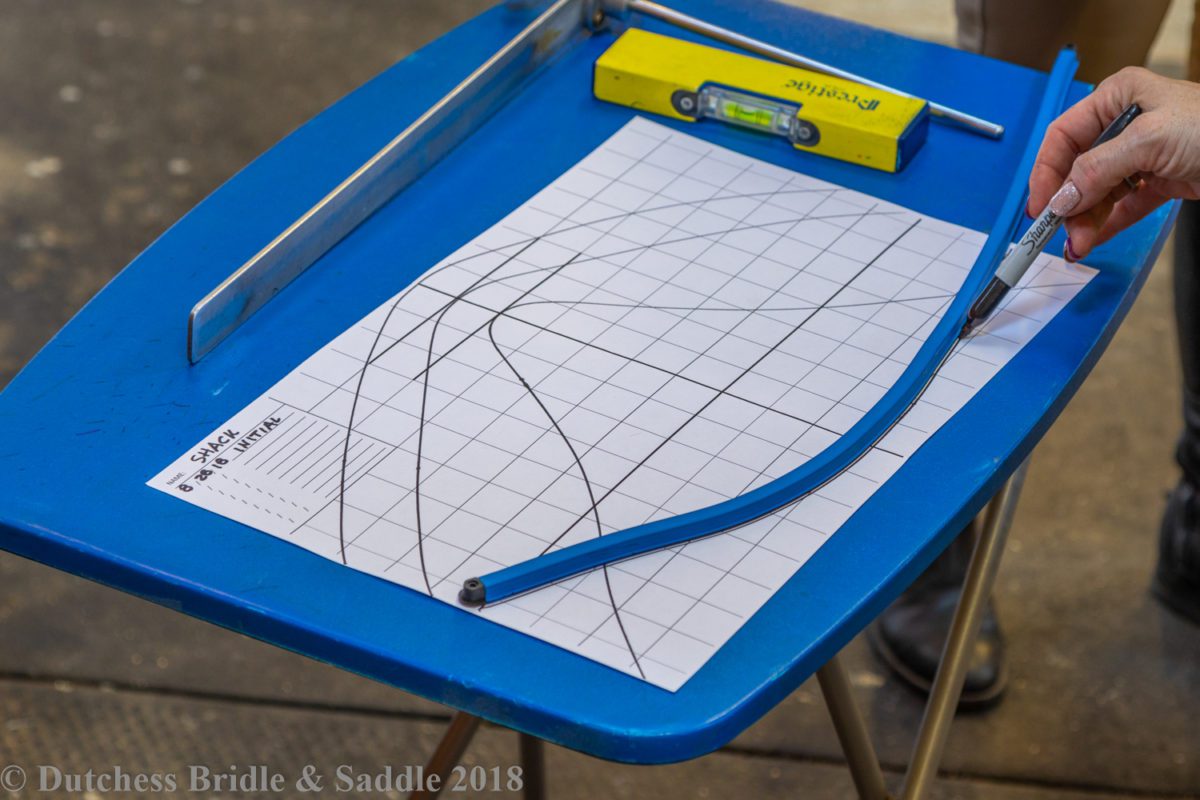
Gently trace the shape of your horse’s topline onto the paper from the underside of the flexible curve.
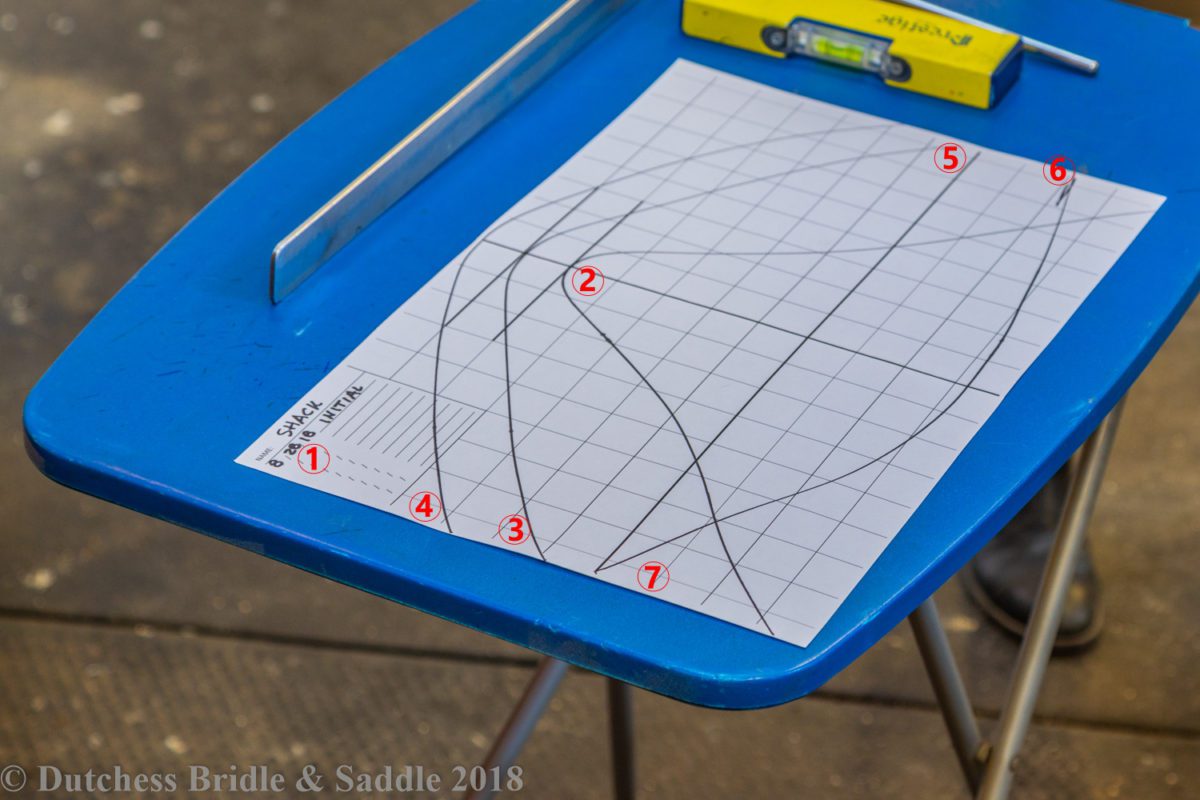
1: Note names and dates. 2: Wither profile. 3: Mid-back profile. 4: Last rib profile. 5: Horizontal line. 6: Vertical drop. 7: Topline tracing.
Take Profile Photos
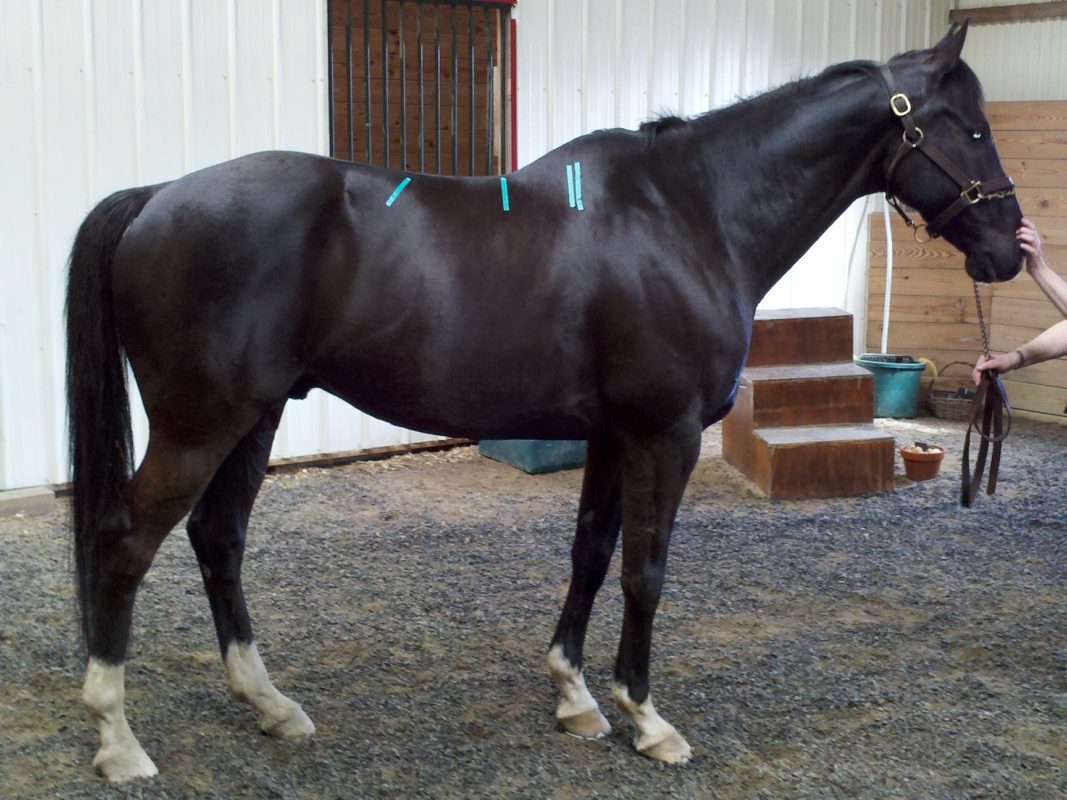
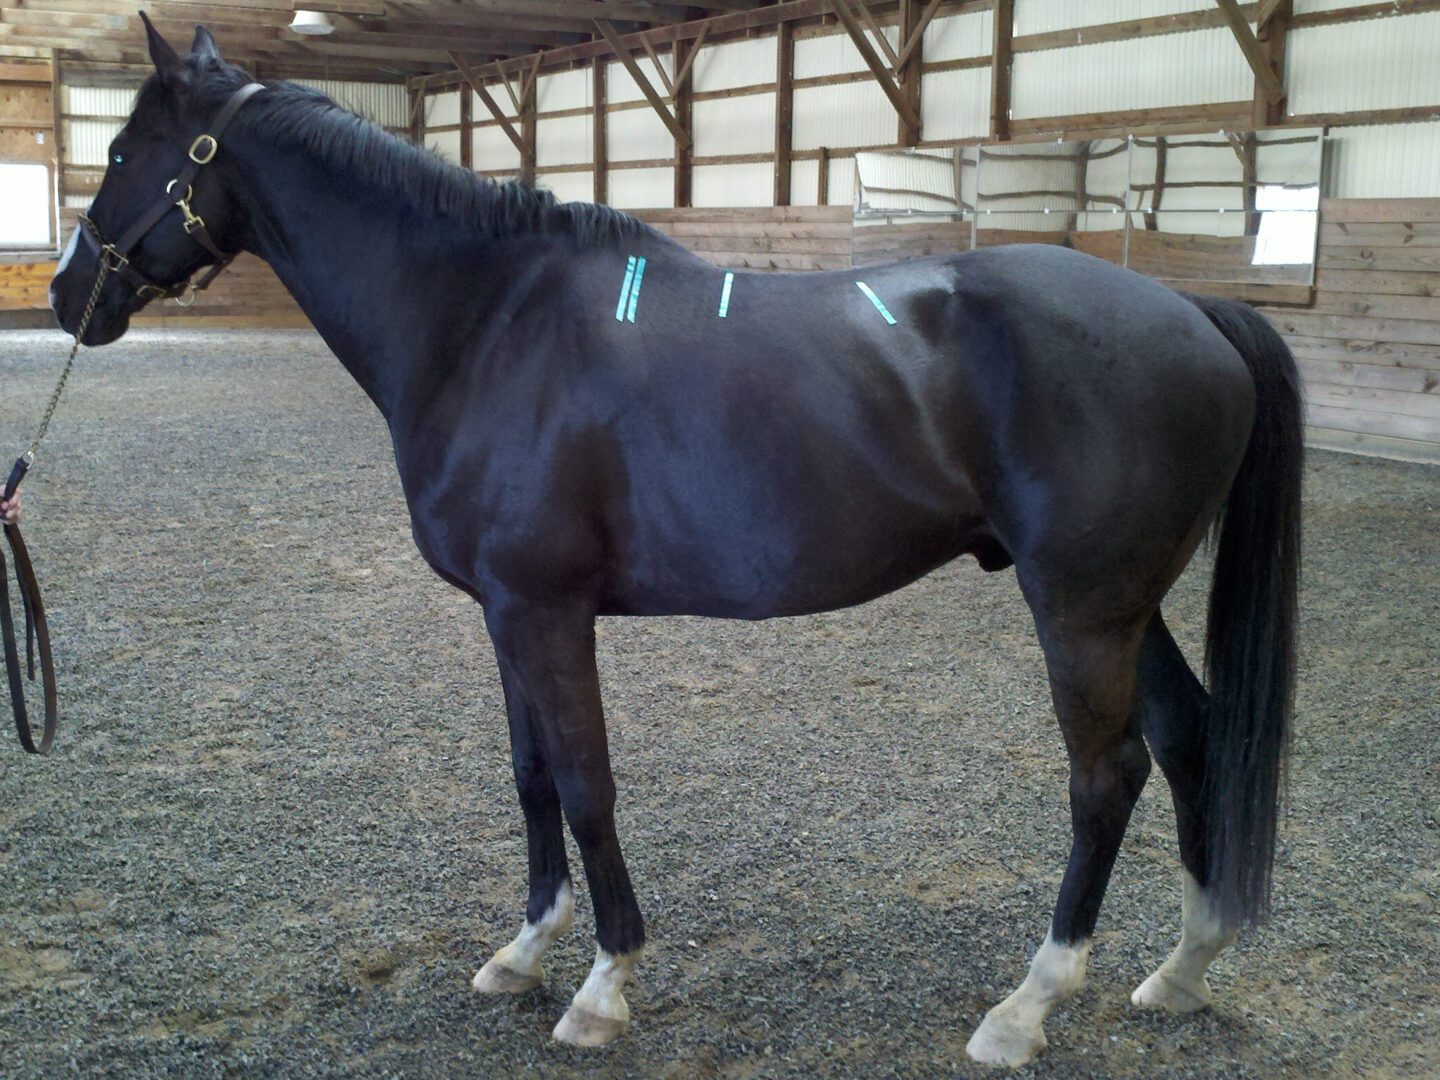
Finally, take a series of profile photos as a reference to include with your tracings. Don’t remove the masking tape you used to mark the tracing areas for these photos! It’s important for us to see where the tracings were taken. Stand your horse as squarely as possible on firm, level ground. Try to have the horse fill as much of the frame as possible in order to clearly see the placement of the tape.
Take a profile photo of your horse from both the left and right sides. Make sure to frame the entire horse in the photo, including hooves and head.
Right side profile with tracing area markings Left side profile with tracing area markings Take the final photo of the horse’s back from above and behind. Make sure the horse is looking forward—your helper can assist with this.
IMPORTANT SAFETY NOTE: This is a very dangerous position to be in as you will be in the horse’s blind spot. Whatever you stand on (we recommend a mounting block) must be sturdy and stable. Let the horse see you getting on the mounting block behind them, then your assistant can straighten their head. Place your hand on the horse’s backside as you are getting up. If your horse has hind end issues and/or will not stand still for this photo, don’t try to take it! Your safety is more important.
This photo shows the angles, shape, and asymmetry of your horse’s back.

Subscribe!
Weekly tips and tricks for caring for your tack, saddle fitting insights, and DBS news delivered straight to your inbox. We never share your email and treat your information like our own.